만약
Nestjs,Typescript를 사용한다면, 새로운 포스트 를 작성했으니 확인 해 보자
Intro
OAuth 인증과 OpenID Connect 에 관해 정리 하고 기본 개념을 확실하게 함과 동시에, 국내에 통합로그인 서비스를 끌어다 이용하는 샘플은 넘쳐나는 반면에 OAuth 서버를 직접 구현하는 예제는 찾아보기 힘들어, RFC 문서를 뒤져가며 삽질한 2달간의 수고로움을 다른사람들은 최대한 피해갔으면 하는 마음에 정리를 시작한다.
이번 포스팅에서는 node-oidc-provider 라는 오픈소스 프로젝트를 사용하여 인증서버를 구현한다.
최대한 이해하기 쉽게 설명 하겠지만 잘 모르겠다면 해당 git을 보고 직접 찾아보면 된다.
본 포스팅을 그대로 따라하다가 문제가 발생했다면, 여기를 참고하자.
귀찮다면 그냥 풀 땡겨서 yarn install ⇒ yarn start 하면 실행된다.
아 기본세팅 그대로 실행 시키려면 로컬에 redis-server 가 설치되어 있어야한다.
우선 OAuth 와 OpenID 에 대한 개념부터 간단하게 시작하여, 끝까지 따라온다면 그럴싸 한 인증서버 구현을 마치는 것이 목표다.
사용 할 기술 스택은 다음과 같다.
- Node.js -v14.15.0
- OIDC-Provider -v6.29.5
- Redis, mongoDB, dynamoDB
- OAuth 2.0
- OpenID Connect
대충 이정도이고, 개발과 아무 관련없는 일반인이 이런 글을 보고 있지는 않을테니 독자는 기본적으로 개발자 라고 가정하겠다.
시작
OAuth 2.0 의 정의부터 알아보자
제 3의 앱이 자원의 소유자인 서비스 이용자를 대신하여 서비스를 요청할 수 있도록 자원 접근 권한을 위임하는 방법
출처 : 금융보안원
말그대로 제3의 앱에 내 데이터의 접근권한을 위임하는 것.
예시로는 우리가 이미 자연스럽게 사용하고있는 구글로 로그인 , 카카오톡 로그인, 네이버로 로그인 등이 있다.
해당 계정으로 로그인을 하면 각 서비스들의 로그인 화면으로 Redirect 된 후 로그인에 성공하면 사용하려는 앱이 요청하는 권한 들을 허용 할 것인지 묻는다.
사용자의 연락처를 조회 할 수 있습니다, 사용자의 친구 목록을 조회 할 수 있습니다 등등..
허용한다면 Access Key가 발급되고, 제 3의 앱 ( 카카오톡, 구글 등 )에 저장되어있는 사용자 정보를 발급받은 key로 요청이 가능해 진다.
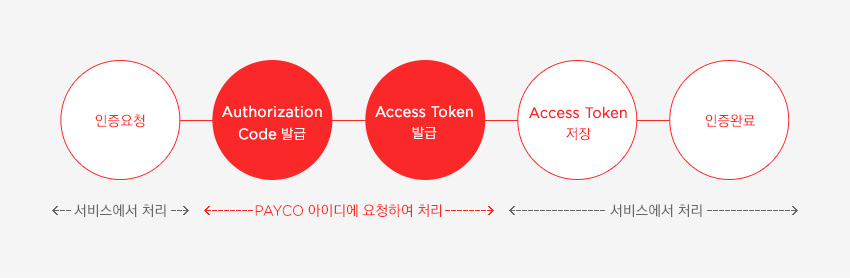
여기까지가 OAuth의 기본 흐름과 개념 끝.
다음은 OpenID로 넘어가 보자.
마찬가지로 정의부터 알아보면,
오픈아이디(OpenID)는 비영리 재단인 OpenID 재단(OpenID Foundation)에서 관리하는 인증 수단이다. 오픈아이디는 분산형 디지털 정체성 시스템으로 모든 사용자들의 온라인 정체성이 URL로 주어지거나(블로그나 홈페이지처럼) 최근의 버전에서는 XRI로 주어지며 이 프로토콜을 지원하는 어떤 서버를 통해서나 인증될 수 있다
출처 : wikipedia
OAuth 보다 이해하기 어렵다.
쉽게 말하면 로그인 과정 ( 개인 신원 확인 )을 종전보다 간편하고 쉽게 하려고 만든 프로토콜 이다.
OAuth 와 동일하게 HTTP를 사용하고, 인증을 위한 프로토콜 같아 보이지만, 두 프로토콜은 목적이 다르다.
OpenID는 인증( Authentication )을, OAuth는 허가( Authorization )를 주 목적으로 한다.
OAuth에도 인증 과정이 있지만 ( 카카오톡 로그인 과정 ) 본질적인 목적은 권한을 ( 친구목록을 불러오거나, 글을 쓸 수 있는 등 )확인하는 것이다.
OAuth를 이용하여 사용자를 인증하는 과정을 OAuth Dance 라고 한다더라. 춤을 추듯 정보를 주고받는 과정을 재미있게 표현 했다나. 직접 구현하다보면 춤은 개뿔 후..
사전지식
인증서버를 구현하는데 필수로 알아야 할 사전지식이다.
인증 종류와 토큰 종류 등등..
Background
third party Application 에 계정정보(ID, PW)를 제공하고 싶지 않은 요구가 첫번쨰 이다.
개인정보를 여러곳에 입력하면서 보안에 취약해지기 때문이다.
초기에는 인증방식에 대한 표준이 전무하여 Twitter의 주도로 Oauth 1.0이 탄생하게 되었다.
Oauth 1.0a
- twitter 로그인 요청
- 사용자를 twitter 로그인 화면으로 redirect
- 사용자가 twitter에 로그인
- twitter 에서 인증토큰 전달
Oauth 2.0
달라진 점
- https가 필수.
- 암호화는 https에 맡긴다.
- 1.0a 는 인증방식이 한가지 였지만 다양한 인증방식을 제공한다.
- api 서버에서 인증서버를 분리 할 수 있도록 해 놓았다.
구성
- Resource owner : 사용자
- Client : Resource server 에서 제공하는 자원을 사용하는 어플리케이션
- Resource server : 자원을 호스팅하는 서버
- Authorization Server : 인증서버, 일반적으로 Resource server 의 하위 도메인에 있는 경우가 많음
인증종류
Oauth 2.0 의 인증종류는 4가지가 있다.
- Authorization Code Grant
- Implicit Grant
- Client Credentials Grant
- Resource Owner Password Credentials Grant
Authorization code grant
서버사이드 코드로 인증하는 방식
권한서버가 클라이언트와 리소스 서버간의 중재역할
Access token을 바로 클라이언트로 전달하지 않아 잠재적 유출을 방지
로그인시에 페이지 URL에 response_type=code 로 넘긴다
     +----------+
     | Resource |
     |   Owner  |
     |          |
     +----------+
          ^
          |
         (B)
     +----|-----+          Client Identifier      +---------------+
     |         -+----(A)-- & Redirection URI ---->|               |
     |  User-   |                                 | Authorization |
     |  Agent  -+----(B)-- User authenticates --->|     Server    |
     |          |                                 |               |
     |         -+----(C)-- Authorization Code ---<|               |
     +-|----|---+                                 +---------------+
       |    |                                         ^      v
      (A)  (C)                                        |      |
       |    |                                         |      |
       ^    v                                         |      |
     +---------+                                      |      |
     |         |>---(D)-- Authorization Code ---------'      |
     |  Client |          & Redirection URI                  |
     |         |                                             |
     |         |<---(E)----- Access Token -------------------'
     +---------+       (w/ Optional Refresh Token)

   Note: The lines illustrating steps (A), (B), and (C) are broken into
   two parts as they pass through the user-agent.

                     Figure 3: Authorization Code Flow
Implicit grant
token과 scope에 대한 스펙등은 다르지만 oauth 1.0a와 가장 비슷한 방식이다
Public Client인 브라우저 기반의 어플리케이션이나 모바일 어플리케이션에서 이 방식을 사용하면 된다
Oauth 2.0에서 가장 많이 사용되는 방식이다
권한코드 없이 바로 발급되어 보안에는 취약하다
주로 read only인 서비스에서 사용된다
로그인시 페이지 URL에 response_type=token 으로 넘긴다
     +----------+
     | Resource |
     |  Owner   |
     |          |
     +----------+
          ^
          |
         (B)
     +----|-----+          Client Identifier     +---------------+
     |         -+----(A)-- & Redirection URI --->|               |
     |  User-   |                                | Authorization |
     |  Agent  -|----(B)-- User authenticates -->|     Server    |
     |          |                                |               |
     |          |<---(C)--- Redirection URI ----<|               |
     |          |          with Access Token     +---------------+
     |          |            in Fragment
     |          |                                +---------------+
     |          |----(D)--- Redirection URI ---->|   Web-Hosted  |
     |          |          without Fragment      |     Client    |
     |          |                                |    Resource   |
     |     (F)  |<---(E)------- Script ---------<|               |
     |          |                                +---------------+
     +-|--------+
       |    |
      (A)  (G) Access Token
       |    |
       ^    v
     +---------+
     |         |
     |  Client |
     |         |
     +---------+

   Note: The lines illustrating steps (A) and (B) are broken into two
   parts as they pass through the user-agent.

                       Figure 4: Implicit Grant Flow
Client credentials grant
어플리케이션이 confidential client ( 인증된, 신뢰할 수 있는 클라이언트 )인 경우 id, secret을 가지고 인증하는 방식
로그인시에 API에 POST로 grant_type=client_credentials 으로 넘긴다
     +---------+                                  +---------------+
     |         |                                  |               |
     |         |>--(A)- Client Authentication --->| Authorization |
     | Client  |                                  |     Server    |
     |         |<--(B)---- Access Token ---------<|               |
     |         |                                  |               |
     +---------+                                  +---------------+

                     Figure 6: Client Credentials Flow
Password credentials grant
Client에 ID/PW를 저장해 놓고 ID/PW로 직접 access token을 받아오는 방식이다
API서비스의 공식 어플리케이션이나 믿을 수 있는 Client에 한해서만 사용해야 한다
로그인시에 API에 POST로 grant_type=password 로 넘긴다
     +----------+
     | Resource |
     |  Owner   |
     |          |
     +----------+
          v
          |    Resource Owner
         (A) Password Credentials
          |
          v
     +---------+                                  +---------------+
     |         |>--(B)---- Resource Owner ------->|               |
     |         |         Password Credentials     | Authorization |
     | Client  |                                  |     Server    |
     |         |<--(C)---- Access Token ---------<|               |
     |         |    (w/ Optional Refresh Token)   |               |
     +---------+                                  +---------------+

            Figure 5: Resource Owner Password Credentials Flow
Token
Access Token
위의 4가지 권한 요청 방식 모두, 요청 절차를 정상적으로 마치면 클라이언트에게 Access Token이 발급된다. 이 토큰은 보호된 리소스에 접근 할 때 권한 확인용으로 사용된다.
     +--------+                               +---------------+
     |        |--(A)- Authorization Request ->|   Resource    |
     |        |                               |     Owner     |
     |        |<-(B)-- Authorization Grant ---|               |
     |        |                               +---------------+
     |        |
     |        |                               +---------------+
     |        |--(C)-- Authorization Grant -->| Authorization |
     | Client |                               |     Server    |
     |        |<-(D)----- Access Token -------|               |
     |        |                               +---------------+
     |        |
     |        |                               +---------------+
     |        |--(E)----- Access Token ------>|    Resource   |
     |        |                               |     Server    |
     |        |<-(F)--- Protected Resource ---|               |
     +--------+                               +---------------+

                     Figure 1: Abstract Protocol Flow
Refresh Token
Access token의 만료시간이 지나면 새로운 토큰을 얻어야 하는데 그때 사용되는 토큰이다. Access token과 같은 형식이며 1회성으로 한번 사용하면 만료된다
  +--------+                                           +---------------+
  |        |--(A)------- Authorization Grant --------->|               |
  |        |                                           |               |
  |        |<-(B)----------- Access Token -------------|               |
  |        |               & Refresh Token             |               |
  |        |                                           |               |
  |        |                            +----------+   |               |
  |        |--(C)---- Access Token ---->|          |   |               |
  |        |                            |          |   |               |
  |        |<-(D)- Protected Resource --| Resource |   | Authorization |
  | Client |                            |  Server  |   |     Server    |
  |        |--(E)---- Access Token ---->|          |   |               |
  |        |                            |          |   |               |
  |        |<-(F)- Invalid Token Error -|          |   |               |
  |        |                            +----------+   |               |
  |        |                                           |               |
  |        |--(G)----------- Refresh Token ----------->|               |
  |        |                                           |               |
  |        |<-(H)----------- Access Token -------------|               |
  +--------+           & Optional Refresh Token        +---------------+

               Figure 2: Refreshing an Expired Access Token
- 마지막으로 OAuth 인증과정을 한번 훑고 바로 구현 시작해보자.
인증과정
인증 프로세스
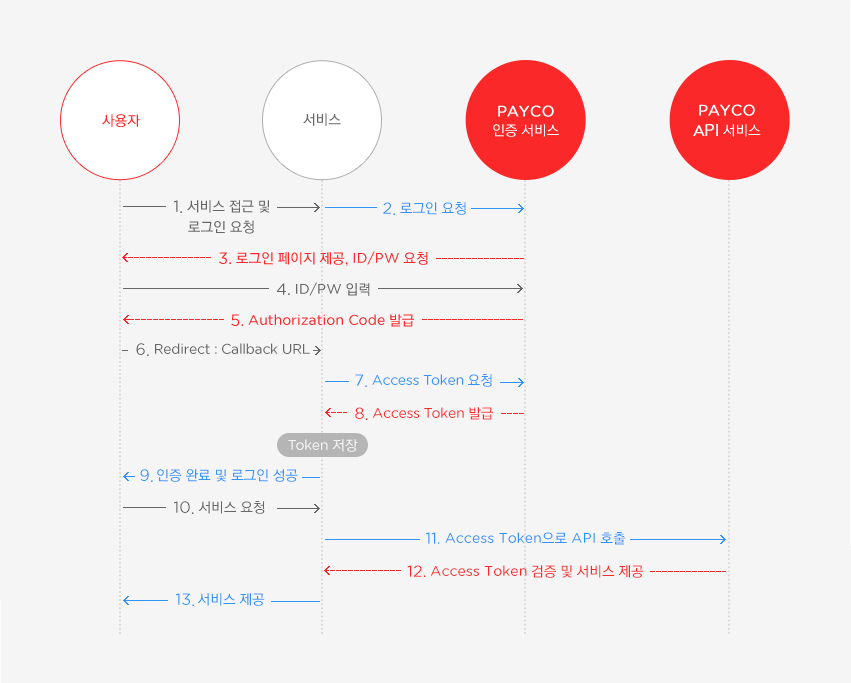
출처 : Payco 개발자센터
해당 그림이 인증과정을 이해하는데 가장 도움이 많이되었기 때문에 Payco에서 가져왔다. 정말 깔끔한 설명인듯.
구현
기본 Node 프로젝트를 시작하듯이 진행하면 된다.
.babelrc
{
  "presets": ["@babel/preset-env"],
  "plugins": ["@babel/plugin-transform-runtime"]
}
CommonJS 와 ES6 문법을 혼용하기 때문에 babelrc 설정을 추가 해주자.
디렉토리 구조
개발자마다 다르기때문에 적절히 참고만 하면 되겠다.
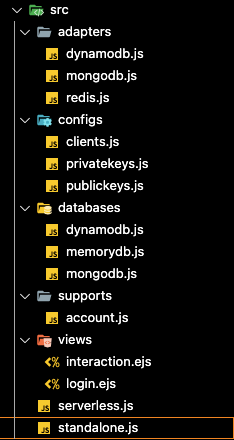
- standalone.js 또는 serverless.js 로 구동한다.
- adapters
- 인증서버에 필요한 데이터들 ( Client정보, Session 정보 등등 )에 관련된 Logic
- 기본 설정은 redis.js
- configs
- 등록 할 Client 정보들을 json list 형태로 저장.
- databasese
- findAccount ⇒ 로그인에 필요한 데이터들 ( 사용자 로그인 정보 등 )을 요청하여 가져오는 API 구현부
- getUser, getUserInfo 등등..
- 기본 설정은 memorydb.js
- supports
- findAccount, checkAccount 구현부
- views
- 인증 요청과 권한 허가 프로세스에서 사용될 UI 구현부.
- oidc-provider에서 기본으로 제공해주는 ejs를 그대로 사용했다.
- 해당 UI도 사용자 입맛에따라 Custom이 가능하다.
standalone.js
import * as dotenv from "dotenv";
dotenv.config();

const { Provider } = require("oidc-provider");
import express from "express";
import bodyParser from "body-parser";
import { initAccount, findAccount, checkAccount } from "./supports/account";

import { clients } from "./configs/clients";
import { privatekeys } from "./configs/privatekeys";
const adapter = require("./adapters/" + process.env.ADAPTER || "redis");

// 가장 중요한부분. provider의 설정값들을 세팅하는 부분이다.
// git에도 이 부분에대한 설명이 부실하고 직접 해보지않으면 뭐하는 설정인지 모르는 것들이 많다.
const configuration = {
  // ... see the available options in Configuration options section
  clients: [
    {
      client_id: "foo",
      client_secret: "bar",
      redirect_uris: ["http://lvh.me:8080/cb"],
      // + other client properties
    },
  ],
  // ...
};

const app = express();

app.set("view engine", "ejs");
app.set("views", path.resolve(__dirname, "views"));

const oidc = new Provider("http://localhost:3000", configuration);

app.use(oidc.callback);

// or just expose a server standalone, see /examples/standalone.js
app.listen(3000, () => {
  console.log("oidc-provider listening on port 3000, check http://localhost:3000/.well-known/openid-configuration");
});
기본 설정이다. express 모듈을 사용하여 oidc-provider를 Mounting 했다.
사용자가 원하는 설정에따라 추가되고 삭제되는 설정들이 존재한다.
더 자세하게 커스텀 하고싶다면 마찬가지로 해당 Git을 직접 참고하자.
다음은 기본 설정값들을 기준으로 각 디렉토리별 파일들의 내용이다. 그대로 복사해서 사용해도 문제없지만 코드를 나름 분석하고 사용하는걸 추천한다.
Adapters
redis.js
// npm i ioredis@^4.0.0
const Redis = require("ioredis"); // eslint-disable-line import/no-unresolved
const isEmpty = require("lodash/isEmpty");

const client = new Redis(process.env.REDIS_URL, { keyPrefix: "oidc:" });

// 저장되는 데이터 종류 set
const consumable = new Set(["AuthorizationCode", "RefreshToken", "DeviceCode"]);

function grantKeyFor(id) {
  return `grant:${id}`;
}

function userCodeKeyFor(userCode) {
  return `userCode:${userCode}`;
}

function uidKeyFor(uid) {
  return `uid:${uid}`;
}

// Adapter 클래스. 기본적으로 키 생성, 삭제, 수정 기능이 전부이다.
class RedisAdapter {
  constructor(name) {
    this.name = name;
  }

  async upsert(id, payload, expiresIn) {
    const key = this.key(id);
    const store = consumable.has(this.name) ? { payload: JSON.stringify(payload) } : JSON.stringify(payload);

    const multi = client.multi();
    multi[consumable.has(this.name) ? "hmset" : "set"](key, store);

    if (expiresIn) {
      multi.expire(key, expiresIn);
    }

    if (payload.grantId) {
      const grantKey = grantKeyFor(payload.grantId);
      multi.rpush(grantKey, key);
      // if you're seeing grant key lists growing out of acceptable proportions consider using LTRIM
      // here to trim the list to an appropriate length
      const ttl = await client.ttl(grantKey);
      if (expiresIn > ttl) {
        multi.expire(grantKey, expiresIn);
      }
    }

    if (payload.userCode) {
      const userCodeKey = userCodeKeyFor(payload.userCode);
      multi.set(userCodeKey, id);
      multi.expire(userCodeKey, expiresIn);
    }

    if (payload.uid) {
      const uidKey = uidKeyFor(payload.uid);
      multi.set(uidKey, id);
      multi.expire(uidKey, expiresIn);
    }

    await multi.exec();
  }

  async find(id) {
    const data = consumable.has(this.name) ? await client.hgetall(this.key(id)) : await client.get(this.key(id));

    if (isEmpty(data)) {
      return undefined;
    }

    if (typeof data === "string") {
      return JSON.parse(data);
    }
    const { payload, ...rest } = data;
    return {
      ...rest,
      ...JSON.parse(payload),
    };
  }

  async findByUid(uid) {
    const id = await client.get(uidKeyFor(uid));
    return this.find(id);
  }

  async findByUserCode(userCode) {
    const id = await client.get(userCodeKeyFor(userCode));
    return this.find(id);
  }

  async destroy(id) {
    const key = this.key(id);
    await client.del(key);
  }

  async revokeByGrantId(grantId) {
    // eslint-disable-line class-methods-use-this
    const multi = client.multi();
    const tokens = await client.lrange(grantKeyFor(grantId), 0, -1);
    tokens.forEach(token => multi.del(token));
    multi.del(grantKeyFor(grantId));
    await multi.exec();
  }

  async consume(id) {
    await client.hset(this.key(id), "consumed", Math.floor(Date.now() / 1000));
  }

  key(id) {
    return `${this.name}:${id}`;
  }
}

module.exports = RedisAdapter;
mongoDB, dynamoDB 등도 사용이 가능하다.
Configs
clients.js
export const clients = [
  // authCodeCredential Test
  {
    client_id: "auth_test",
    client_secret: "123",
    application_type: "web",
    id_token_signed_response_alg: "ES256",
    redirect_uris: ["http://localhost:3001/auth"],
    response_types: ["code"],
    grant_types: ["refresh_token", "authorization_code"],
    pkceMethods: ["S256"],
    post_logout_redirect_uris: ["http://localhost:3001/"],
    scope: "openid",
    token_endpoint_auth_method: "client_secret_basic",
  },
  // clientCredential Test
  {
    client_id: "test",
    client_secret: "test",
    application_type: "web",
    id_token_signed_response_alg: "ES256",
    redirect_uris: [],
    response_types: [],
    grant_types: ["client_credentials"],
    pkceMethods: [],
    post_logout_redirect_uris: [],
  },
];
인증서버에 등록하여 사용할 Client의 정보를 저장한다. Client별로 인증방식, 제공할 정보 등이 다르다.
Database
memorydb.js
const low = require("lowdb");
const Memory = require("lowdb/adapters/Memory");

class MemoryDB {
  constructor() {
    this.name = "memorydb";

    this.db = low(new Memory());
    this.db
      .defaults({
        users: [
          {
            id: "23121d3c-84df-44ac-b458-3d63a9a05497",
            loginId: "user01",
            loginPassword: "",
          },
        ],
      })
      .write();
  }

  getUser(loginId) {
    return new Promise((resolve, reject) => {
      const item = this.db.get("users").find({ loginId: loginId }).value();

      resolve(item);
    });
  }

  getUserById(id) {
    return new Promise((resolve, reject) => {
      const item = this.db.get("users").find({ id: id }).value();

      resolve(item);
    });
  }
}

module.exports = MemoryDB;
lowdb를 사용한 가장 간단한 db 구현. 사용자 정보 검색.
Supports
account.js
import crypto from "crypto";
import DynamoDB from "../databases/dynamodb";
import MemoryDB from "../databases/memorydb";
import MongoDB from "../databases/mongodb";

var database = null;

// 설정에따라 사용할 DB 선택
const initAccount = target => {
  if (target === "dynamodb") {
    database = new DynamoDB();
  } else if (target === "mongodb") {
    database = new MongoDB();
  } else {
    database = new MemoryDB();
  }
};

const findAccount = async (ctx, id) => {
  console.log("findAccount: ", id);
  const item = await database.getUserById(id);
  if (!item) {
    return undefined;
  }

  // Token정보에 포함될 user 정보 return
  return {
    // accountId: id,
    // << Update Accesstoken's "sub" claim >>
    async claims(use, scope) {
      console.log("claims: ", use, scope);
      return {
        sub: id,
        loginId: item.loginId,
      };
    },
  };
};

const checkAccount = async (loginId, password) => {
  try {
    console.log("authenticate: ", loginId, password);
    const item = await database.getUser(loginId);
    // Password 검증 부분. 각자 구현해야 할 부분.
    // DB에서 가져온 password와 전달받은 값의 hash값을 비교하는 logic
    if (item) {
      const key = crypto.pbkdf2Sync(password, item.loginPasswordSalt, 1026, 64, "sha512").toString("hex");
      if (key === item.loginPassword) {
        return item.id;
      }
    }

    return undefined;
  } catch (err) {
    console.log(err);
    return undefined;
  }
};

export { initAccount, findAccount, checkAccount };
위의 memorydb.js와 동일하게 mongoDB, dynamoDB 모두 getUser, getUserById 함수만 API로 맞춰서 구현하면 env설정값에따라 다르게 적용 가능하다.
views
interaction.ejs
<div class="login-client-image">
  <% if (client.logoUri) { %><img src="<%= client.logoUri %>"><% } %>
</div>

<ul>
<% if ([details.missingOIDCScope, details.missingOIDCClaims, details.missingResourceScopes].filter(Boolean).length === 0) { %>
  <li>the client is asking you to confirm previously given authorization</li>
<% } %>

<% missingOIDCScope = new Set(details.missingOIDCScope); missingOIDCScope.delete('openid'); missingOIDCScope.delete('offline_access') %>
<% if (missingOIDCScope.size) { %>
  <li>scopes:</li>
  <ul>
    <% missingOIDCScope.forEach((scope) => { %>
      <li><%= scope %></li>
    <% }) %>
  </ul>
<% } %>

<% missingOIDCClaims = new Set(details.missingOIDCClaims); ['sub', 'sid', 'auth_time', 'acr', 'amr', 'iss'].forEach(Set.prototype.delete.bind(missingOIDCClaims)) %>
<% if (missingOIDCClaims.size) { %>
  <li>claims:</li>
  <ul>
    <% missingOIDCClaims.forEach((claim) => { %>
      <li><%= claim %></li>
    <% }) %>
  </ul>
<% } %>

<% missingResourceScopes = details.missingResourceScopes %>
<% if (missingResourceScopes) { %>
  <% for (const [indicator, scopes] of Object.entries(details.missingResourceScopes)) { %>
    <li><%= indicator %>:</li>
    <ul>
      <% scopes.forEach((scope) => { %>
        <li><%= scope %></li>
      <% }) %>
    </ul>
  <% } %>
<% } %>

<% if (params.scope && params.scope.includes('offline_access')) { %>
  <li>
  the client is asking to have offline access to this authorization
    <% if ((!details.missingOIDCScope) || !details.missingOIDCScope.includes('offline_access')) { %>
      (which you've previously granted)
    <% } %>
  </li>
<% } %>
</ul>
<form autocomplete="off" action="/interaction/<%= uid %>/confirm" method="post">
  <button autofocus type="submit" class="login login-submit">Continue</button>
</form>
login.ejs
<% if (locals.google) { %>
<form autocomplete="off" action="/interaction/<%= uid %>/federated" method="post">
  <input type="hidden" name="upstream" value="google">
  <button type="submit" class="google-button">
    <span class="google-button__icon">
      <svg viewBox="0 0 366 372" xmlns="http://www.w3.org/2000/svg"><path d="M125.9 10.2c40.2-13.9 85.3-13.6 125.3 1.1 22.2 8.2 42.5 21 59.9 37.1-5.8 6.3-12.1 12.2-18.1 18.3l-34.2 34.2c-11.3-10.8-25.1-19-40.1-23.6-17.6-5.3-36.6-6.1-54.6-2.2-21 4.5-40.5 15.5-55.6 30.9-12.2 12.3-21.4 27.5-27 43.9-20.3-15.8-40.6-31.5-61-47.3 21.5-43 60.1-76.9 105.4-92.4z" id="Shape" fill="#EA4335"/><path d="M20.6 102.4c20.3 15.8 40.6 31.5 61 47.3-8 23.3-8 49.2 0 72.4-20.3 15.8-40.6 31.6-60.9 47.3C1.9 232.7-3.8 189.6 4.4 149.2c3.3-16.2 8.7-32 16.2-46.8z" id="Shape" fill="#FBBC05"/><path d="M361.7 151.1c5.8 32.7 4.5 66.8-4.7 98.8-8.5 29.3-24.6 56.5-47.1 77.2l-59.1-45.9c19.5-13.1 33.3-34.3 37.2-57.5H186.6c.1-24.2.1-48.4.1-72.6h175z" id="Shape" fill="#4285F4"/><path d="M81.4 222.2c7.8 22.9 22.8 43.2 42.6 57.1 12.4 8.7 26.6 14.9 41.4 17.9 14.6 3 29.7 2.6 44.4.1 14.6-2.6 28.7-7.9 41-16.2l59.1 45.9c-21.3 19.7-48 33.1-76.2 39.6-31.2 7.1-64.2 7.3-95.2-1-24.6-6.5-47.7-18.2-67.6-34.1-20.9-16.6-38.3-38-50.4-62 20.3-15.7 40.6-31.5 60.9-47.3z" fill="#34A853"/></svg>
    </span>
    <span class="google-button__text">Sign in with Google</span>
  </button>
</form>
<div class="login-help">
  - or -
</div>
<% } %>
<form autocomplete="off" action="/interaction/<%= uid %>/login" method="post">
  <input required type="text" name="login" placeholder="Enter any login" <% if (!params.login_hint) { %>autofocus="on"<% } else { %> value="<%= params.login_hint %>" <% } %>>
  <input required type="password" name="password" placeholder="and password" <% if (params.login_hint) { %>autofocus="on"<% } %>>

  <button type="submit" class="login login-submit">Sign-in</button>
</form>
UI 구현부.
Login 로직이 다르다면 ( email 정보까지 로그인에 필요하다 등등.. ) 해당 코드를 수정해서 사용하면 된다.
Configuration
가장 중요한 부분이라 섹션을 따로 뺐다.
provider를 생성하기전에 설정값들을 지정해 두고 mounting 한다. 직접 해보지않으면 뭐하는 설정인지 감조차 오지않는 것들이 많기 때문에 …
- 사실 해당 git documentation을 정독해도 이해가 가지 않는 부분들 투성이 인데다가 해당레포 마스터가 그닥 친절한 타입이 아니라 Issue에 response 달린것들도 대부분 - 내 코드는 문제없으니 너가 설정을 잘못한거야 - 라는 태도.. 모르겠는 설정들은 RFC 문서를 뒤져보면 자세하게 설명 되어있다.
내가 사용한 config기준으로 각 필드들이 무엇을 의미하는지 찍먹 해보자.
standalone.js
const configs = {
  clients, // clients.js에서 등록한, 인증서버를 사용하게 될 client들의 정보.
  jwks: privatekeys, // key 발급에 사용될 비대칭 암호키
  adapter: adapter, // 사용할 adapter 클래스. 만약 connection이 필요한 DB ( mongo, dynamo ) 등을 사용한다면 conn 초기화 작업이 먼저 이루어져 있어야한다.
  findAccount: findAccount, // 사용자 정보를 조회할 API 구현부
  // Token의 format을 지정하는 설정.
  formats: {
    // 인증방식에따라 각각 포맷을 지정할 수 있다.
    AccessToken: "jwt",
    ClientCredentials: "jwt",
    // Token의 기본 field 이외에 추가로 넣고싶은 값을 지정.
    customizers: {
      async jwt(ctx, token, jwt) {
        // Token에 "issuerId"라는 필드를 추가
        jwt.payload.issuerId = "custom-field";
      },
    },
  },
  // client.js에서 설정될 client들의 기본 설정들을 지정. 만약 해당 값을 client.js에서 다시 지정한다면 덮어써진다.
  clientDefaults: {
    id_token_signed_response_alg: "ES256",
    token_endpoint_auth_method: "client_secret_basic",
  },
  // 발급받은 Token을 통해 요청할 수 있는 정보와 API의 제한 범위를 지정.
  // 설명하기 가장 어려운 부분이다... 자세한 개념은 검색을 하는게 좋을 것 같다. 키워드는 claims, scope.
  claims: {
    openid: ["sub"],
    profile: ["email", "loginId"],
  },
  // Client의 cookie 이름 등을 custom 할 수 있는 설정.
  cookies: {
    names: {
      session: "_custom_auth_session",
      interaction: "_interaction",
      resume: "_interaction_resume",
    },
    long: {
      httpOnly: true,
      overwrite: true,
      sameSite: "none",
    },
    short: {
      httpOnly: true,
      overwrite: true,
      sameSite: "lax",
    },
    keys: [],
  },
  // 인증과정 진행 시 routing 될 경로 지정.
  interactions: {
    url(ctx, interaction) {
      return `/interaction/${interaction.uid}`;
    },
  },
  // authCode 인증방식에서 code 교환시 pkce 검증과정을 추가할지 여부. false로 할 시 검증과정을 생략한다.
  // pkce가 무엇인지는 RFC7636 https://datatracker.ietf.org/doc/html/rfc7636 참조.
  pkce: {
    methods: ["S256"],
    required: true,
  },
  // TimeToLive. 토큰의 유효 기간을 지정하는 설정. 아래는 기본값으로 필요하다면 늘려서 사용 가능하다.
  ttl: {
    AccessToken: function AccessTokenTTL(ctx, token, client) {
      if (token.resourceServer) {
        return token.resourceServer.accessTokenTTL || 60 * 60;
      }
      return 60 * 60;
    },
    AuthorizationCode: 600,
    ClientCredentials: function ClientCredentialsTTL(ctx, token, client) {
      if (token.resourceServer) {
        return token.resourceServer.accessTokenTTL || 10 * 60;
      }
      return 10 * 60;
    },
    Grant: 1209600,
    IdToken: 3600,
    Interaction: 3600,
    Session: 3600,
  },
  // 추가적인 기능들. 각 설정들은 프로토콜상 지원하는 기능들 이다.
  features: {
    devInteractions: { enabled: false },
    encryption: { enabled: true },
    // 토큰 검증기능 on/off
    introspection: {
      enabled: true,
    },
    // 동적 Client 생성 기능 ( client.js에 등록된 client이외에 추가로 동적으로 등록이 가능하도록 )
    registration: {
      enabled: true,
      // 허가되지 않은 사용자의 client 등록을 차단하기위한 secret key.
      initialAccessToken: "initial_secret",
    },
    // client 등록에 사용되는 인증 절차에 관한 설정
    registrationManagement: {
      enabled: true,
      rotateRegistrationAccessToken: false,
    },
    // 발급한 토큰을 폐지하는 기능 on/off
    revocation: { enabled: true },
    // clientCredential 인증방식 허용 여부. 다른 인증방식에 비해 보안이 취약하기 때문에 별도 설정으로 활성화 시켜야한다.
    clientCredentials: { enabled: true },
  },
  // refreshToken을 발급 하는 case 지정.
  issueRefreshToken: async function issueRefreshToken(ctx, client, code) {
    // client 설정의 auth_type 에 refresh_token 값이 있으면~
    if (!client.grantTypeAllowed("refresh_token")) {
      return false;
    } else {
      return true;
    }
  },
  // accessToken에 필요한 값을 추가하는 기능
  extraAccessTokenClaims: async function extraAccessTokenClaims(ctx, token) {
    // 토큰이 clientCredentials 인증방식이고, 요청의 body에 "custom_token"이라는 필드가 있다면 access_token에 해당값 추가한 뒤 return.
    if (token.kind === "ClientCredentials" && ctx.req.body.custom_token) {
      return {
        custom_access_token: "custom_access_token_test",
      };
    }
  },
};
처음보면 어지러울수도 있지만 하나하나 찬찬히 테스트 해 보면 감이 온다.
Interaction
standalone.js 에서 provider를 생성하기전에 express에 interaction route를 달아주자.
auth-code 인증방식 프로세스에서 사용자에게 로그인 창과 권한 허가를 받을 때 사용하는 endpoint이다.
standalone.js
app.get("/interaction/:uid", setNoCache, async (req, res, next) => {
  try {
    const { uid, prompt, params, session } = await provider.interactionDetails(req, res);

    const client = await provider.Client.find(params.client_id);

    switch (prompt.name) {
      case "login": {
        return res.render("login", {
          client,
          uid,
          details: prompt.details,
          params,
          title: "Sign-in",
          session: session ? debug(session) : undefined,
          dbg: {
            params: debug(params),
            prompt: debug(prompt),
          },
        });
      }
      case "consent": {
        return res.render("interaction", {
          client,
          uid,
          details: prompt.details,
          params,
          title: "Authorize",
          session: session ? debug(session) : undefined,
          dbg: {
            params: debug(params),
            prompt: debug(prompt),
          },
        });
      }
      default:
        return undefined;
    }
  } catch (err) {
    return next(err);
  }
});

app.post("/interaction/:uid/login", setNoCache, body, async (req, res, next) => {
  try {
    const {
      prompt: { name },
    } = await provider.interactionDetails(req, res);
    assert.equal(name, "login");
    const account = await Account.findByLogin(req.body.login);

    const result = {
      login: {
        accountId: account.accountId,
      },
    };

    await provider.interactionFinished(req, res, result, { mergeWithLastSubmission: false });
  } catch (err) {
    next(err);
  }
});

app.post("/interaction/:uid/confirm", setNoCache, body, async (req, res, next) => {
  try {
    const interactionDetails = await provider.interactionDetails(req, res);
    const {
      prompt: { name, details },
      params,
      session: { accountId },
    } = interactionDetails;
    assert.equal(name, "consent");

    let { grantId } = interactionDetails;
    let grant;

    if (grantId) {
      // we'll be modifying existing grant in existing session
      grant = await provider.Grant.find(grantId);
    } else {
      // we're establishing a new grant
      grant = new provider.Grant({
        accountId,
        clientId: params.client_id,
      });
    }

    if (details.missingOIDCScope) {
      grant.addOIDCScope(details.missingOIDCScope.join(" "));
    }
    if (details.missingOIDCClaims) {
      grant.addOIDCClaims(details.missingOIDCClaims);
    }
    if (details.missingResourceScopes) {
      // eslint-disable-next-line no-restricted-syntax
      for (const [indicator, scopes] of Object.entries(details.missingResourceScopes)) {
        grant.addResourceScope(indicator, scopes.join(" "));
      }
    }

    grantId = await grant.save();

    const consent = {};
    if (!interactionDetails.grantId) {
      // we don't have to pass grantId to consent, we're just modifying existing one
      consent.grantId = grantId;
    }

    const result = { consent };
    await provider.interactionFinished(req, res, result, { mergeWithLastSubmission: true });
  } catch (err) {
    next(err);
  }
});

app.get("/interaction/:uid/abort", setNoCache, async (req, res, next) => {
  try {
    const result = {
      error: "access_denied",
      error_description: "End-User aborted interaction",
    };
    await provider.interactionFinished(req, res, result, { mergeWithLastSubmission: false });
  } catch (err) {
    next(err);
  }
});
끝
인증서버는 이정도 세팅이면 마무리가 되었다.
정확한 코드 및 설명은 https://github.com/panva/node-oidc-provider 여기를 참고하고,
본 포스팅은 https://github.com/Cozy-Ho/oidc-provider 여기를 참고하자. 해당 Repo를 clone해 와서 yarn install 후 yarn start하면 실행된다.
서버는 기본 8888포트에서 돌고있고, 해당 인증서버에 요청을 보내는 client는 postman으로 해도 가능은 하지만, Auth-code인증방식은 테스트하기 복잡하기때문에 웬만하면 따로 만들어서 테스트 하는게 좋다. 구현 해 놓은 테스트용 client도 추가할까 했지만 테스트용 코드라 깔끔하지도 않고 양도 꽤 많아서 생략했다. 혹시 필요한 사람이 있다면 따로 공유하는걸로하고..
기본적인 인증서버의 설정들은 SERVER_IP:PORT/.well-known/openid-configuration 접근해보면 사용가능한 endpoint들과 설정들이 json 형태로 출력되니 참고하자.
진행도중 이상한 부분이나 질문은 댓글 남기면 내가 아는 범위에서는 도움을 줄 수 있지만, 큰 도움은 못 될 지도…
인증서버 구현은 해야하는데 볼 자료는 거지같은 프로젝트 공식 Git 문서와 더 거지같은 RFC 문서밖에 없어서 삽질 꽤나 했다. 대부분 구현된 서버를 이용하겠지만 혹시 직접 구현하고자 하는 누군가를 위해..! 화이팅.